HOME / BLOG / Minilibx Tutorial
Let's create a canvas!
NO MALLOC
This tutorial covers:
- Loops
- Events
- Mouse Events
- Click Events
- Key Events
- Key pressed Events
- Colors

Introduction
If you haven't read my MLX Starter Pack go back and have a look.
Now that we have libmlx installed we can start playing with it.
We will start by creating a new window.
Now that we have libmlx installed we can start playing with it.
We will start by creating a new window.
void * mlx_init ();
The function above is the most basic function of the library, which returns a pointer to our program instance. In other words it will return an address which will be used to identify our program.
void *    mlx_new_window     ( void *mlx_ptr, int size_x, int size_y, char *title );
int       mlx_clear_window   ( void *mlx_ptr, void *win_ptr );
int       mlx_destroy_window ( void *mlx_ptr, void *win_ptr );
These are the functions that will help us create, clear & destroy windows.
* notice that the mlx_ptr attribute should be the address correspoinding our program instance (i.e. return value from mlx_init)
* notice that the mlx_ptr attribute should be the address correspoinding our program instance (i.e. return value from mlx_init)
To create a window we must first initialize our mlx program (mlx_init) and then create a window (mlx_new_window).
mlx_loop() will trigger an infinite loop which will allow the window to stay open (will get to this later)...
mlx_loop() will trigger an infinite loop which will allow the window to stay open (will get to this later)...
#include <mlx.h>

int main(void)
{
	void	*mlx_ptr;
	void	*win_ptr;

	mlx_ptr = mlx_init();
	if (!mlx_ptr)
		return (1);
	win_ptr = mlx_new_window (mlx_ptr, 300, 300, "Hello World");
	if (!win_ptr)
		return (2);
	mlx_loop(mlx_ptr);
	return (0);
}


Window
Great, now we have an empty window, and it's great but I think that it's a lot of code to have on the main function.
Now we will create a structure that will hold:
Now we will create a structure that will hold:
- mlx_ptr
- win_ptr
- window height
- window width
This way we can "pack" all these values in one single data structure, and it will be easier to move it around.
And we will be able to create a window in just one line from the main.
And we will be able to create a window in just one line from the main.
include/window.h
#ifndef WINDOW_H
# define WINDOW_H

typedef struct s_win
{
	void	*mlx_ptr;
	void	*win_ptr;
	int		height;
	int		width;
}		t_win;

#endif
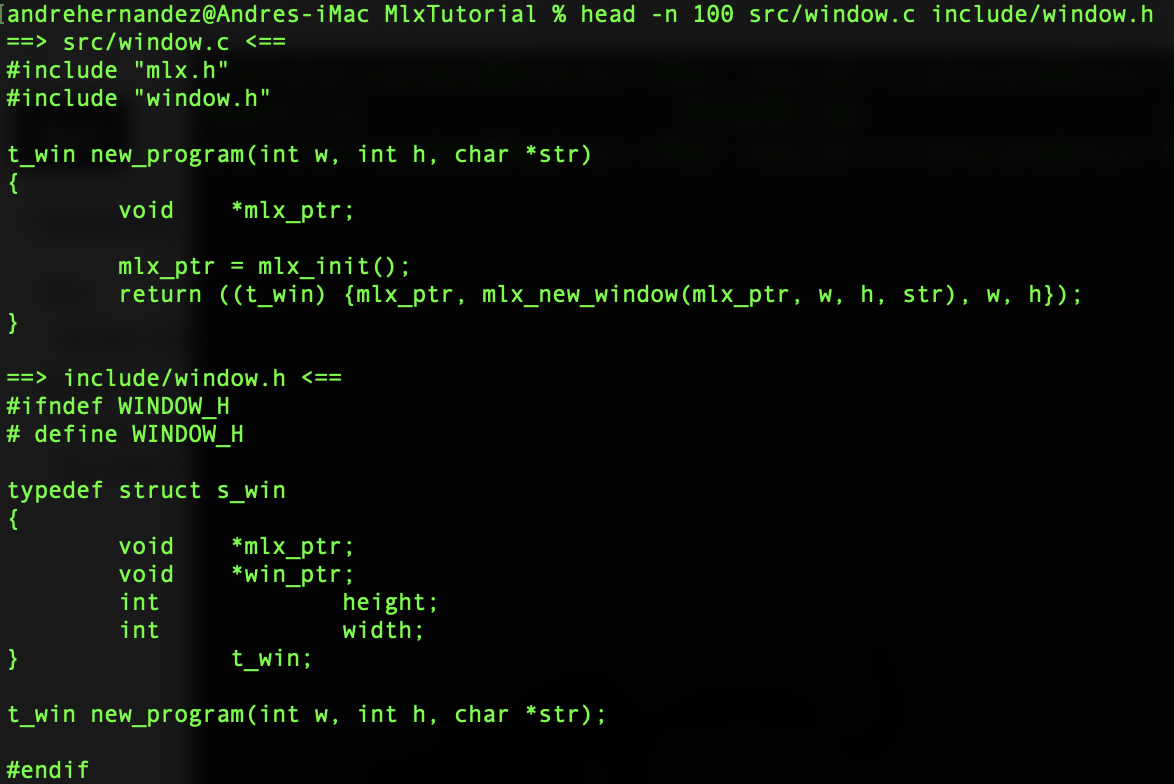
We can create a function that will generate our data structure like this:
t_win new_program(int w, int h, char *str)
{
	void	*mlx_ptr;

	mlx_ptr = mlx_init();
	return ((t_win) {mlx_ptr, mlx_new_window(mlx_ptr, w, h, str), w, h});
}
int main(void)
{
/**
* void *mlx_ptr;
* void *win_ptr;
*
* mlx_ptr = mlx_init();
* if (!mlx_ptr)
* return (1);
* win_ptr = mlx_new_window (mlx_ptr, 300, 300, "Hello World");
* if (!win_ptr)
* return (2);
* mlx_loop(mlx_ptr);
**/
t_win tutorial;
tutorial = new_program(300, 300, "New Program");
if (!tutorial.mlx_ptr || !tutorial.win_ptr)
return (1);
mlx_loop(tutorial.mlx_ptr);
return (0);
}I decided to create a new file which only handles the program creation
src/window.c
I also added the prototype of the function to the window header include/window.h
(See img)

Images
Now that we have a black window it would seem logical to think that we can just start placing pixels with different colors, and that's how we can "draw" inside the window. And in fact, that is correct and we have the following function for that:
int mlx_pixel_put ( void *mlx_ptr, void *win_ptr, int x, int y, int color );
Although this is a very slow method. To place ONE pixel the engine will need to access the program, draw the pixel in the position desired and return a success or failure integer.
That's why we use images, we draw inside the image all the information we want and after that, we draw the complete image only once. Instead of pixel by pixel.
That's why we use images, we draw inside the image all the information we want and after that, we draw the complete image only once. Instead of pixel by pixel.
From this point, whenever I write "image" I don't mean an image as in a "photograph" or a file.
Think of an image as a structure which contains "pixels", each designated to one color. The image has a defined height and width and all it's pixels (row, column) can have a color.
You can convert a "file" which contains a conventional "image" [png, bmp, jpeg] to an mlx "image" but let's not get into that right now.
       void *
       mlx_new_image ( void *mlx_ptr, int width, int height );

       char *
       mlx_get_data_addr ( void *img_ptr, int *bits_per_pixel, int *size_line, int *endian );

       int
       mlx_put_image_to_window ( void *mlx_ptr, void *win_ptr, void *img_ptr, int x, int y );

       unsigned int
       mlx_get_color_value ( void *mlx_ptr, int color );

       void *
       mlx_xpm_to_image ( void *mlx_ptr, char **xpm_data, int *width, int *height );

       void *
       mlx_xpm_file_to_image ( void *mlx_ptr, char *filename, int *width, int *height );

       int
       mlx_destroy_image ( void *mlx_ptr, void *img_ptr );
Now it's time to create an image, and later drop it into the window in order to visualize it.
First, we will need to create an image and then we will need to store all the relevant values that will help us manipulate the image.
I will not explain in detail how images work because it would be a long explanation, also it's explained in the manual...
These are the elements that we need to store to manipulate an image:
- img_ptr
- addr
- bpp
- endian
- line_len
- height
- width
The first one is the address of our mlx image instance you can think of it as an identifier.
The pixels in our image are represented as bytes thus characters, addr is the address where this chain of bytes starts.
Since we have a chain of bytes we must have a way to know how many of these bytes represent ONE pixel, this number is stored in the integer bpp (bits per pixel).
For example:
The pixels in our image are represented as bytes thus characters, addr is the address where this chain of bytes starts.
Since we have a chain of bytes we must have a way to know how many of these bytes represent ONE pixel, this number is stored in the integer bpp (bits per pixel).
For example:
char *addr = {'f', '1', 'a', '2', '4', '2', '4', '2', '1', '0', '0', '6',};
Have in mind that once character == 1 byte & 1byte == 8 bits.
If bpp (bits per pixel) was 8 [bpp = 8], then each of the characters would represent 1 pixel.
"f" would be the first pixel value, "1" would be the second pixel value, etc;
If bpp = 16 =>
"f1" would be the first pixel value, "a2" would be the second, and so on...
line_len refers to the number of bytes one line holds (in the addr).
Taking the example presented above.
If line_len was = 4 (4bytes). Then the row of the images would be something like this:
f1a2
4224
1006
Finally, height and width are the width and height of the image.
It would be very useful to store the instance of the window to whom this image belongs.
It would be very useful to store the instance of the window to whom this image belongs.
typedef struct s_img
{
	t_win	win;
	void	*img_ptr;
	char	*addr;
	int		h;
	int		w;
	int		bpp;
	int		endian;
	int		line_len;
}		t_img;

It's now time to create an image and add it to the window :D
t_img	image_4x4;

image_4x4.win = tutorial;
image_4x4.img_ptr = mlx_new_image(tutorial.mlx_ptr, 4, 4);
image_4x4.addr = mlx_get_data_addr(image_4x4.img_ptr, &(image_4x4.bpp), &(image_4x4.line_len), &(image_4x4.endian));
image_4x4.w = 4;
image_4x4.h = 4;
In the image bellow you can find out what is the bbp, line_len. endian and adress of the image in my computer...


	printf("Let's Find out what's inside our structure :D\n");
	printf("img_ptr		: [%p]\n", image_4x4.img_ptr);
	printf("bpp		: [%d]\n", image_4x4.bpp);
	printf("line_len	: [%d]\n", image_4x4.line_len);
	printf("endian		: [%d]\n", image_4x4.endian);
	printf("addr		: [%p]\n", image_4x4.addr);
First look at bpp = 32. This of course means that every pixel, inside addr, is represented by 32 bits.
Since the addr data type is a character (char == 1 byte == 8 bits) this means that 4 characters (4bytes == 32 bits) represent one pixel.
Remember that our image is 4 x 4 pixels, and since 4 characters represent one pixel, of course, the line_len is 16 (4 pixels per line).
So we found out that we can represent pixels with 4 bytes, and integers are also 4 bytes... it seems only logical to think that we can (and should) represent the pixels with numbers. But always have in mind that the pixels are represented with bytes, we just happened to find it convenient to use integers to interpret their value.
Let's concider the first pixel of our example. We know that it's represented by 4 bytes [x - x - x - x] each byte is 8 bits:x x x x x x x x - x x x x x x x x - x x x x x x x x - x x x x x x x x
Imagine that we set the first pixel to ['s' - '4' - 'v' - 'f'] converted from the ascii table [115 - 52 - 118 - 102], each of this bytes can also be represented in bits:x 1 1 1 0 0 1 1 - x x 1 1 0 1 0 0 - x 1 1 1 0 1 1 0 - x 1 1 0 0 1 1 0
We can go ahead and fill every pixel with "s4vf", (4 bytes == 1 pixel). So the 16 pixels of our image would be:
So our addr would be:
So our addr would be:
s4vfs4vfs4vfs4vfs4vfs4vfs4vfs4vfs4vfs4vfs4vfs4vfs4vfs4vfs4vfs4vf
We can copy that string into the addr and then drop the image at coordinates [10, 10] into the window to see what pixel color "s4vf" represents...
memcpy(image_4x4.addr, "s4vfs4vfs4vfs4vfs4vfs4vfs4vfs4vfs4vfs4vfs4vfs4vfs4vfs4vfs4vfs4vf", 16*4);
mlx_put_image_to_window (image_4x4.win.mlx_ptr, image_4x4.win.win_ptr, image_4x4.img_ptr, 10, 10);

Just like we did with the window, we can create a function that generates an image structure to reduce the lines on the main function.
t_img	new_img(int w, int h, t_win window)
{
	t_img	image;

	image.win = window;
	image.img_ptr = mlx_new_image(window.mlx_ptr, w, h);
	image.addr = mlx_get_data_addr(image.img_ptr, &(image.bpp),
			&(image.line_len), &(image.endian));
	image.w = w;
	image.h = h;
	return (image);
}

Colors
       +------------------------------------------------+
       |                 Color Integer                  |
       +---------------+--------+--------+-------+------+
       |Interpretation |   a    |   R    |   G   |  B   |
       +---------------+--------+--------+-------+------+
       |   Bit numbers | 31..24 | 23..16 | 15..8 | 7..0 |
       +---------------+--------+--------+-------+------+
You need to understand this table above in order to continue with the tutorial... it's explained in the manuals.
An integer represents 4 bytes, and we can separate every byte of the number, and that's how we represent colors in MLX.
a(alpha channel), R(Red), G(Green), B(Blue).
For example 0x00FF0000 represents pure RED color & 0x000000FF a pure BLUE color.
We can copy the bytes of a number into an addr, and that's how you can set colors to pixels.
Here are some useful functions to convert colors (we don't need them for this tutorial):
(You can download the file below although you won't need it for this tutorial)
int	gen_trgb(int opacity, int red, int green, int blue)
{
	if (opacity > 255 || red > 255 || green > 255 || blue > 255)
		return (0);
	return (opacity << 24 | red << 16 | green << 8 | blue);
}

int	get_opacity(int trgb)
{
	return ((trgb >> 24) & 0XFF);
}

int	get_r(int trgb)
{
	return ((trgb >> 16) & 0XFF);
}

int	get_g(int trgb)
{
	return ((trgb >> 8) & 0XFF);
}

int	get_b(int trgb)
{
	return (trgb & 0xFF);
}To place a pixel into our image, we must know 3 things:
- Color
- Row
- Column
We can calculate the memory address where our pixel (4 bytes) is, and copy the color.
Given: int x, int y, int coloraddr_index = (line_len * y) + (x * (bpp / 8))(line_len * y) is the start of the colum on the addr.
(bpp / 8) where 8 represents 8 bits per character, to find out how many bytes is one pixel.
(x * (bpp / 8)) is the column of the pixel
void	put_pixel_img(t_img img, int x, int y, int color)
{
	char	*dst;

	dst = img.addr + (y * img.line_len + x * (img.bpp / 8));
	*(unsigned int *) dst = color;
}
If you want you can protect your function in order not to draw outside the given img
void	put_pixel_img(t_img img, int x, int y, int color)
{
	char	*dst;

	if (x >= 0 && y >= 0 && x < img.w && y < img.h) {
		dst = img.addr + (y * img.line_len + x * (img.bpp / 8));
		*(unsigned int *) dst = color;
	}
}
Now we can try to put a pixel to our image and then drop the image into our window.
I created a window 300x300 and an image 300x300.
Let's try to put one white pixel in the middle of our image.
I created a window 300x300 and an image 300x300.
Let's try to put one white pixel in the middle of our image.
{
	/* Put white pixel */
	put_pixel_img(image, 150, 150, 0x00FFFFFF);
	mlx_put_image_to_window (image.win.mlx_ptr, image.win.win_ptr, image.img_ptr, 0, 0);
}
The full version of the code:
#include <mlx.h>
#include "window.h"

t_win	new_program(int w, int h, char *str);
t_img	new_img(int w, int h, t_win window);
void	put_pixel_img(t_img img, int x, int y, int color);

int main(void)
{
 	t_win	tutorial;
	t_img	image;

	tutorial = new_program(300, 300, "tutorial");
	if (!tutorial.win_ptr)
		return (2);
	image = new_img(300, 300, tutorial);

	{
		/* Put white pixel */
		put_pixel_img(image, 150, 150, 0x00FFFFFF);
		mlx_put_image_to_window (image.win.mlx_ptr, image.win.win_ptr, image.img_ptr, 0, 0);
	}

	mlx_loop(tutorial.mlx_ptr);
	return (0);
}

Events
If you remember at the beginning I used the mlx_loop() function, this function will enable an infinite loop that will keep our window running, but most importantly this loop will read the hooks that we defined.
This means that obviously, we have to define ALL our hooks before the loop, only then, the hook will trigger the events.
With events, we can get input from the user, and change our window accordingly.
There are many events that we can use to trigger our program the most common are:
This means that obviously, we have to define ALL our hooks before the loop, only then, the hook will trigger the events.
With events, we can get input from the user, and change our window accordingly.
There are many events that we can use to trigger our program the most common are:
- Keyboard Events
- Key Pressed
- Key Released
- Mouse Events
- Mouse Movement
- Mouse Focus
- Right Click
- Left Click
- Scroll Up
- Scroll Down
MLX offers a generic "hook" function where you can choose any Event to trigger but it also has a few specific functions designed for the most common events.
       int
       mlx_loop ( void *mlx_ptr );

       int
       mlx_key_hook ( void *win_ptr, int (*funct_ptr)(), void *param );

       int
       mlx_mouse_hook ( void *win_ptr, int (*funct_ptr)(), void *param );

       int
       mlx_expose_hook ( void *win_ptr, int (*funct_ptr)(), void *param );

       int
       mlx_loop_hook ( void *mlx_ptr, int (*funct_ptr)(), void *param );
mlx_key_hook will be triggered on the key released event, while mlx_mouse_hook will be called on click/scroll, mlx_loop_hook will be called while no event is triggered.
MLX also offers the most generic hook function which receives an integer that defines the hook that we want to use.
mlx_hook( void *win_ptr, int event, int mask, int (*funct_ptr)(), void *param );
List of Events and Masks
Events
- KeyPress => 02
- KeyRelease => 03
- ButtonPress => 04
- ButtonRelease => 05
- MotionNotify => 06
- EnterNotify => 07
- LeaveNotify => 08
- FocusIn => 09
- FocusOut => 10
- KeymapNotify => 11
- Expose => 12
- GraphicsExpose => 13
- NoExpose => 14
- VisibilityNotify => 15
- CreateNotify => 16
- DestroyNotify => 17
- UnmapNotify => 18
- MapNotify => 19
- MapRequest => 20
- ReparentNotify => 21
- ConfigureNotify => 22
- ConfigureRequest => 23
- GravityNotify => 24
- ResizeRequest => 25
Masks
- NoEventMask => 0L
- KeyPressMask => 1L<<0
- KeyReleaseMask => 1L<<1
- ButtonPressMask => 1L<<2
- ButtonReleaseMask => 1L<<3
- EnterWindowMask => 1L<<4
- LeaveWindowMask => 1L<<5
- PointerMotionMask => 1L<<6
- PointerMotionHintMask => 1L<<7
- Button1MotionMask => 1L<<8
- Button2MotionMask => 1L<<9
- Button3MotionMask => 1L<<10
- Button4MotionMask => 1L<<11
- Button5MotionMask => 1L<<12
- ButtonMotionMask =>1L<<13
- KeymapStateMask => 1L<<14
- ExposureMask => 1L<<15
- VisibilityChangeMask => 1L<<16
- StructureNotifyMask => 1L<<17
- ResizeRedirectMask => 1L<<18
- SubstructureNotifyMask => 1L<<19
- SubstructureRedirectMask => 1L<<20
- FocusChangeMask => 1L<<21
- PropertyChangeMask => 1L<<22
- ColormapChangeMask => 1L<<23
- OwnerGrabButtonMask => 1L<<24
mlx_hook( void *win_ptr, int event, int mask, int (*funct_ptr)(), void *param );
This function will be the next one we will be using.
We want to exit our program when the user clicks the red cross on the top of the window. That event is #17, so:
mlx_hook(win_ptr, 17, 0, exit_tutorial, &window);
Some Operating Systems will need you to specify a mask, in this case I'll you can use the mask for keyPressed (1L<<0)
mlx_hook(win_ptr, 17, 1L<<0, exit_tutorial, &window);
src/main.c => win_ptr == tutorial.win_ptr
mlx_hook(tutorial.win_ptr, 17, 0, exit_tutorial, &tutorial);
int     exit_tutorial(t_win *window)
{
	if (window)
		mlx_destroy_window (window->mlx_ptr, window->win_ptr);
	exit(EXIT_SUCCESS);
}

The Canvas Game
The canvas game is a game about drawing squares on a canvas, so we need a function that can draw a square, and obviously, we need another structure to represent a square.
The square attributes are:
The square attributes are:
- y
- x
- color
- size
x and y represent the top left corner of the square, while the size represents the width and height of the square.
typedef struct s_square {
	unsigned short int	x;
	unsigned short int	y;
	unsigned short int	size;
	int					color;
}		t_square;
Now we must create a function to draw a square into the image
void	draw_square(t_square square, t_img img)
{
	unsigned short int	i;
	unsigned short int	j;

	i = 0;
	while (i < square.size && i + square.y < img.h)
	{
		j = 0;
		while (j < square.size && j + square.x < img.w)
		{
			put_pixel_img(img, j + square.x, i + square.y, square.color);
			j++;
		}
		i++;
	}
}
At this point, we have to organize our code.
So far you might have
So far you might have
- src/
- main.c
- window.c
- image.c
- include/
- window.h
I decided to create an include/canvas.h for the game headers, the square structure; etc.
Then I created src/canvas.c to place all the functions related to the game.
Now let's use our new function to draw a square on the image, and then display it in the window.
src/main.c
{
	/*Draw a gigant GREEN square 300x300 */
	draw_square((t_square){0, 0, 300, 0x00FF00}, image);
	mlx_put_image_to_window (image.win.mlx_ptr, image.win.win_ptr, image.img_ptr, 0, 0);
}


We are almost finished, we just need to cover some things...
We need an integer that will determine the "brush" size, an integer that will determine the color of the brush, and we need a boolean (true/false) that will determine if the brush will follow the mouse or not.
We could use a struct to store the "logic" for the game, but let's not waste more time and just create some global variables to do this...
int size = 10;
int follow = 0;
We must include the following events:
- Draw a square "on click"
- If follow is enabled, draw a square "on mouse move"
- Increase/decrease the size (you can choose an event for this... I will choose key "arrow up" "arrow down"
- On key "ESC" quit the program
- Key "c" change color
- Key "p" draw Penguin
- Key Enter "clean" canvas
mlx_key_hook (win_ptr, read_keys, param);
mlx_mouse_hook (win_ptr, read_mouse, param);
mlx_hook(win_ptr, 6, 0, follow_mouse, param);
mlx_hook(win_ptr, 2, 0, continuous_read_keys, param);
For each hook, we are sending a different function.
Now we should create those 4 functions read_keys, read_mouse, follow_mouse, and continuous_read_keys.
We need to define some MACROS to help us visualize the code. All the keys in your keyboard have an identifier and this varies from OS and keyboard so you might want to check which keys are which to define them. On my computer these are the values:
# define ESC 53   // key escape
# define ENTER 36 // key "enter"
# define FOLLOW 3 // key "f"
# define COLOR 8  // key "c"
# define UP 126   // key "arrow up"
# define DOWN 125 // key "arrow down"
# define PENGUIN 35 // key "p"
# define RAND_COLOR 15 // key "r"
read_keys -> will be triggered when a key is pressed.
The program should escape on key "ESC" pressed.
The canvas should be "cleaned" when the key "Enter" is pressed.
When pressed "f" follow should be enabled/disabled.
When pressed "c" the brush should change color.
The key "p" invokes a penguin!!! :D // this will be left for later...
The key "r" will also change the brush color, but randomly
#include <stdlib.h>

int get_color()
{
        return (rand() % 2147483647);
}

int     read_keys(int key_pressed, void *param)
{
        t_img *img;

        img = (t_img *)param;
        if (key_pressed == ESC || !img)
                exit_tutorial(&img->win);
        else if (key_pressed == ENTER)
                draw_square((t_square){0, 0, img->w, 0xFFFFFF}, *img);
        else if (key_pressed == FOLLOW)
                follow = !follow;
        else if (key_pressed == COLOR)
                color = get_color();
        //else if (key_pressed == PENGUIN)
        //        penguin(*img);
        else
                return (-1);
        mlx_put_image_to_window(img->win->mlx_ptr, img->win->win_ptr, img->img_ptr, 0, 0);
        return (0);
}
Define the prototype of this function on your header.
int read_keys(int key_pressed, void *param);
Now we can set our first mlx_key_hook, which will read the keys on release.
int main(void)
{
        t_win   tutorial;
        t_img   image;

        tutorial = new_program(300, 300, "tutorial");
        if (!tutorial.win_ptr)
                return (2);
        image = new_img(300, 300, tutorial);
        {
                /*Draw a gigant GREEN square 300x300 */
                draw_square((t_square){0, 0, 300, 0x00FF00}, image);
                mlx_put_image_to_window (image.win.mlx_ptr, image.win.win_ptr, image.img_ptr, 0, 0);
        }
        /*HOOOOOOK*/
        mlx_key_hook (tutorial.win_ptr, read_keys, &image);
        /**********/
        mlx_hook(tutorial.win_ptr, 17, 0, exit_tutorial, &tutorial);
        mlx_loop(tutorial.mlx_ptr);
        return (0);
}
read_mouse -> will be triggered when the mouse is clicked/scrolled.
If triggered, draw a square in the coordinates of the mouse.
(This function receives as parameters the coordinates where the mouse was)
int read_mouse(int button, int mouse_x, int mouse_y, void *param)
{
	int 		x;
	int 		y;
	t_img 		*img;
	t_square	s;

	img = (t_img *) param;
	if (!img)
		return (-1);
	if (mouse_x < 0 || mouse_y < 0 || mouse_x > img->w || mouse_y > img->h)
		return (2);
	x = ((mouse_x % img->w) / size) * size;
	y = ((mouse_y % img->h) / size) * size;
	s = (t_square){x, y, size, color};
	draw_square(s, *img);
	mlx_put_image_to_window(img->win.mlx_ptr, img->win.win_ptr, img->img_ptr, 0, 0);
	(void)button;
	return (0);
}
Again, define the prototype of this function on your header and add the hook to your main.
include/canvas.h
int read_mouse(int button, int mouse_x, int mouse_y, void *param);
src/main.c
mlx_mouse_hook(tutorial.win_ptr, read_mouse, &image);
Now you should be able to draw squares with your mouse, exit, change color and clean the canvas!
.gif)
The key_hook is only triggered when the key is released, to change the size of the brush is very painful to press the key a bunch of times to get it very small or very big.
We can implement a hook that will trigger while the key is pressed not only once it was released.
Since MLX doesn't offer a special function for this we need to use the generic mlx_hook().
Key pressed is the event #2, so we can do something like this:
We can implement a hook that will trigger while the key is pressed not only once it was released.
Since MLX doesn't offer a special function for this we need to use the generic mlx_hook().
Key pressed is the event #2, so we can do something like this:
mlx_hook(win_ptr, 2, 0, int (*funct_ptr)(), void *param);
continuous_read_keys -> will be triggered while a key is being pressed
Change the brush size while pressing arrows down/up
(This function receives as parameters the coordinates where the mouse was)
int	continuous_read_keys(int key_pressed, void *param)
{

	t_img *img;

	img = (t_img *)param;
	if (!img)
		exit_tutorial(&img->win);
	else if (key_pressed == UP)
	{
		if (size < img->w / 4)
			size++;
	}
	else if (key_pressed == DOWN)
	{
		if (size > 1)
			size--;
	}
	else if (key_pressed == RAND_COLOR)
		color = get_color();
	return (0);
}
Again, define the prototype of this function on your header and add the hook to your main.
include/canvas.h
int	continuous_read_keys(int key_pressed, void *param);
src/main.c
mlx_hook(tutorial.win_ptr, 2, 0, continuous_read_keys, &image);
Finally, we must trigger while the mouse moves.
Mouse action is the event #6, so we can do something like this:
mlx_hook(win_ptr, 6, 0, int (*funct_ptr)(), void *param);
follow_mouse -> when the mouse moves.
If follow is enabled, draw a square on the grid position of the mouse.
(This function receives as parameters the coordinates where the mouse was)
int follow_mouse(int mouse_x, int mouse_y, void *param)
{
	int 		x;
	int 		y;
	t_img 		*img;
	t_square	s;

	img = (t_img *) param;
	if (!img)
		return (1);
	if (mouse_x < 0 || mouse_y < 0 || mouse_x > img->w || mouse_y > img->h)
		return (2);
	if (!follow)
		return (3);
	x = ((mouse_x % img->w) / size) * size;
	y = ((mouse_y % img->h) / size) * size;
	s = (t_square){x, y, size, color};
	draw_square(s, *img);
	mlx_put_image_to_window(img->win.mlx_ptr, img->win.win_ptr, img->img_ptr, 0, 0);
	return (0);
}
One last time..., define the prototype of this function on your header and add the hook to your main.
include/canvas.h
int	follow_mouse(int mouse_x, int mouse_y, void *param);
src/main.c
mlx_hook(tutorial.win_ptr, 6, 0, follow_mouse, &image);
Now we can enable/disable the "follow" option :)
Finally, I created a surprise for you :D it's a penguin!!! Yes, a cute penguin! :D
Add the following prototype to your header:
void penguin(t_img img);
And on the key_hook function, read_keys, you can either delete the comments or add the next condition to draw a penguin when "p" is pressed.
	else if (key_pressed == PENGUIN)
		penguin(*img);
I hope you enjoyed this tutorial and liked it.
If you have any suggestions/questions, don't hesitate to reach me at pulgamecanica11@gmail.com.
There is a repository you can download for reference, not quite the same but is a very very similar project.
https://github.com/pulgamecanica/42Course/tree/main/42Documentation/tutorial_minilibx_part2
You can also download the whole project which is on the tutorial.zip

